
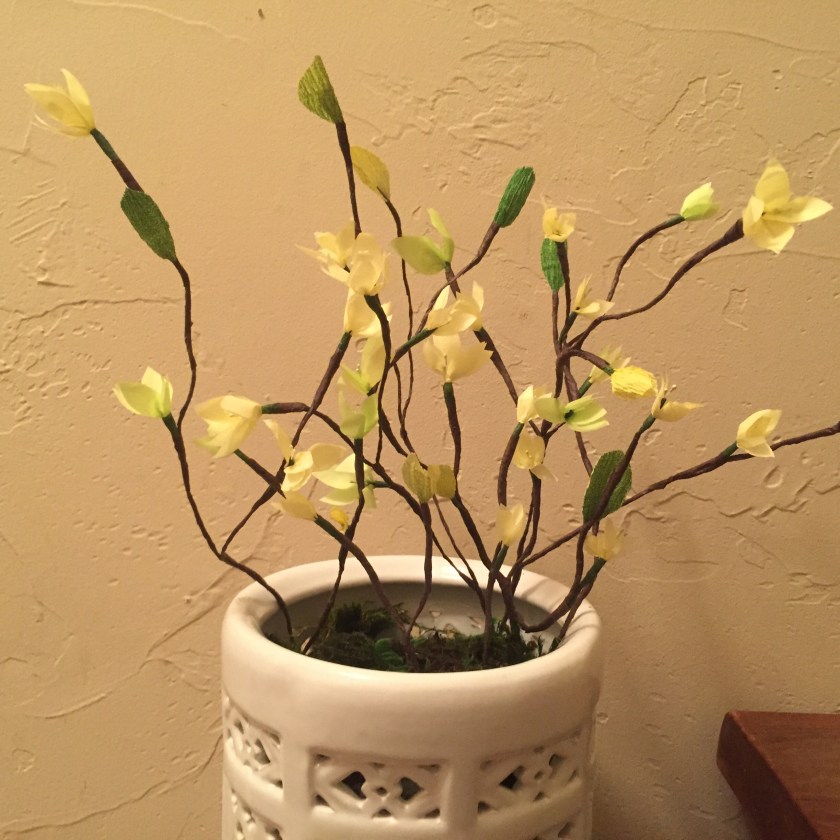
My current flower project is to recreate the budding branches of my forsythia….something tall and bright for an umbrella stand that sits in my entryway. As I create my ‘mini-trees’ I am reminded of these fabulous wire trees a friend of mine makes…..each branch is smaller in scale with thinner, more malleable wire but the technique is the same. As my mom and I worked together on this project, I found and worked out more than a few kinks in my original plan. These flowers may be a bit bigger than your standard forsythia but the bigger petals make them easier to handle and they still look cute. I also made my leaves with tissue paper at first to make obtaining your supplies easier, but they just didn’t look right. I ended up using crepe paper for the leaves, but cardstock or scrapbook paper may do in a pinch. And that my friends is why I’m here….to work my way through the mistakes so you don’t have to.
So, without further adieu, let’s gather our supplies:
- scissors
- wire cutters

- light or medium yellow tissue paper
- green or lime green heavier crepe or craft paper. Mine is yellow-green gradient crepe from Castle in the air.
- yellow or green stamens. I found some lime green pips in Hobby Lobby’s cake decorating section that work especially well, but small yellow ones are cute too.
- brown floral tape for the branches
- green floral tape for the leaves and flowers
- floral wire….the cheaper kind that comes on spools, because we will be using a lot and we want a longer cut of wire than the precut pieces.
- my flower petal and leaves template.
First off we want to create our branches. I created branches that are about 30 inches tall using various lengths of wire twisted together.
- Cut 4 to 6 sections of wire in various lengths, depending on how tall you want your arrangement.
- Hold the wires all together and start twisting them together from the bottom up to form your branch. Pull out wire in twos as you work your way up to resemble the smaller twigs coming out of the thicker branch. You can separate some of your wire pairs to make even smaller twigs.
- Wrap brown floral tape around your wire, working up from the larger stem and up into the smaller twigs. Stretch the tape slightly as you go to activate the adhesive. Cover the whole branch with brown tape. The following video will hopefully give you a clearer picture of how I twist and wrap my wire (as well as adding the flowers later).
Now we need to make our flowers and leaves for the top.
- Download and cut out my petal and leaf templates here: Templates, forsythia
- Cut petals in yellow tissue paper and leaves in craft paper or crepe, long side with the grain. You will need 8 petals and 1 pip for each flower. I used my larger leaves by themselves and the smaller leaves attached together in pairs. The flowers will the bulk of the color in our arrangement so cut enough to make several flowers.
- Layer and shape your petals. Make 4 petals by layering them in pairs. Twist each pair together at the base while folding inward so they look a bit like a spoon.
- Fold one pip in half and attach to a 1.5 inch section of wire by wrapping a small section of green floral tape around it.
 Now position 4 petals around the pip center and attach with another section of green floral tape. You don’t have to cover the entire section of wire with green tape because we will attach these to your branch with brown tape later. If you need help with your flower-making and wire wrapping technique, watch my YouTube video on my previous flower post, Paper daffodils.
 - I think it looks cute to attach the smaller leaves in pairs. If using crepe paper, scrunch the bases and attach to a 1.5 inch section of wire (using green tape) with their colorful sides facing each other. Gently stretch the middle of the leaves so they cup towards each other.
- The larger leaves can be stretched slightly, scrunched at the base and simply attached straight to a branch by themselves with brown tape.
- Attach flowers and leaves in various positions around your branch. To attach, hold the flower where you want it with one hand and leaving a little of the green tape showing at its base, wrap a small section (about 2 inches) of brown tape downwards until you have attached the entire small piece to your branch. To keep your tape from coming undone at the bottom, use your fingernail to make a small crease where you stopped.
- When you have all your flowers and leaves attached where you want them, gently shape your arrangement, and display! You may want to make a few branches (as I have done) for a greater visual impact.


That’s all folks!….uhhh, I mean, paper florists! Stay tuned later this week for a simple (no template required) Tulip gift topper, perfect for dressing up your favorite gal’s Mother’s Day gift. For now, this is KristyMichele signing out…
